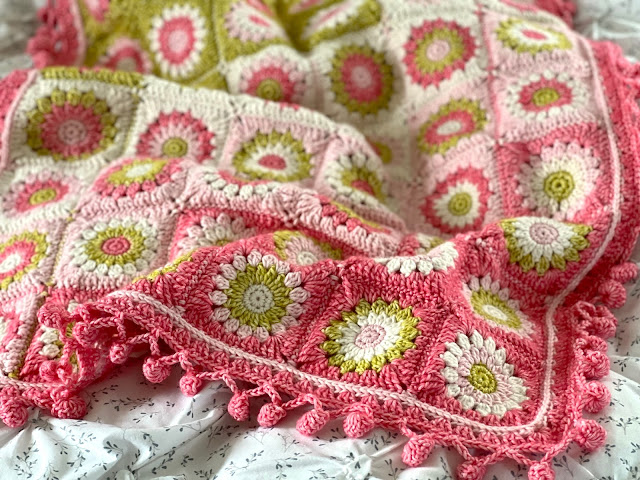
RSS Feed follow me link Bloglovin' follow me link Posts by email follow me link Facebook Like me link Twitter Follow me link Ravelry Follow me link Pinterest follow me link Instagram follow me link 

21 I'm going to the chapel....

 ... but I'm not getting married.

Actually, I'm not even going to a chapel.  I'm going to a beautiful  and picturesque pub in the English countryside and I'm going to watch my dear, sweet Sister in Law get married.

It's quite soon and I'm really looking forward to it but I'm also hoping and wishing that the weather will improve because the reception is in a marquee in the grounds and it will just be the most perfect day if the sun will shine.  Won't you shine for us, Sun?  Pretty please, just a little bit?


I already have a dress that I want to wear and I've found some darling shoes to go with it.  I'm planning on borrowing a cute little fascinator type thing to perch upon my head and so all I really need to complete the ensemble is a cute little purse that will pull it all together.  

I was lying in bed when I had this fabulous 'make a bag' revelation and although I knew how I wanted it to look and that I had the perfect fabrics for what I wanted to do, I wasn't sure exactly how to proceed with construction.  I've not really sewn many, if any, bags before and as I lay there mulling over ideas I decided some extra help would be needed to get the job done.

It turns out that I had pinned this cute little clutch about a million years ago and it was exactly the sort of thing I had in mind.  A nice shape, not too big, with a little bit of patchwork to include all my colour co-ordinating fabrics.  The perfect inspiration.  The only thing was, I had for some reason imagined a bag with a recessed zipper in my  nocturnal pondering.  I didn't know that was what it was called at the time mind you, but later research tells me this is so.  As I had no idea how to go about 'recessing' a zipper, I turned to wiser heads than mine to show me the way.  In this case it was Jane from 'Projects from Jane' who shed the light.

The whole thing came together in an afternoon, which I always find a most satisfactory thing and I think it turned out well.  Like any first attempt, it's not perfect.  I can see that improvements could be make should there ever be a next time, but I really am quite pleased with the thing.  It looks how I wanted it to look, more or less.  It happily can hold all that I may wish to stow there.  (Which does not include 'looking after' the car keys for you, Dear Husband of Mine!)

But most importantly, I think it will work with the dress and it look part of the outfit.


S x


My posts, delivered to you...

      RSS        Email      Feedly    Follow on Bloglovin Bloglovin' 

73 Sampler Blanket

 There's something I've been working on for a while now.  It's turned out to be quite a mammoth beast in the end, but a cuddly and eminently enjoyable beast.

You're probably familiar with the concept of a blanket made up of samples of lots of different patterns.  It's a popular idea and as usual, one that didn't immediately stop me in my tracks.  But one pretty picture led to another until I came across one that tipped me over the edge.  This one to be exact, of a scarf by the oh so talented Coco Rose.  Isn't it a gorgeous sight?

That did it, I fell in love and my mind was filled with images of what a blanket of these squares could be.  My mind saw soft, my mind saw subtle and my mind decided that a blanket of such squares should have a faded vintage look.  A lacy, frilly and open look.  Sort of Victorian lace cuffs and old washed out photographs.  Time to go a wadding in the stash pools and see what I could fish out!

My stash rewarded me well and I gathered most of the colours I needed.  I started making squares in an aimless kind of way, leafing through the book (links at the end folks...) and picked out patterns that I liked at random, matching it the to colour I thought it would look nicest in.  A very pleasant past time.


Making squares is a nice way to make a blanket I think.  Each one feels like a mini project itself and so the finish of each one brings a little sense of achievement.  Especially when each one is a new pattern to be mastered.  I went on this bumbling meandering way for a while until I had a square or two in every colour and then, as it so often does, my mind searched around for a little more purpose.  Meandering along on a journey is enjoyable it said, but at some point aren't we going to need to know where are we actually going?  I sometimes wish I was a more 'wing it' and leave it to chance sort of person, but the truth is I am not.  I am a plan it out in and have a road map to follow sort of person.  So I started making plans.

The plan wanted to know how many squares I should make, the plan needed to know how many in each colour, how many different patterns would I actually use and how, oh how, will I be joining these squares?  There was much to be decided upon but isn't that the joy of it?  Thinking of options, trying out ideas, checking it all against the mind's image of the 'ultimate goal' to see if you can actually pull it off as you intended?

 Well, we all have our own methods, no doubt.  But, happy now that my path was, if not set in stone, at least following a compass direction of some sort, I strolled forth.  Not rushing but enjoying the journey, giving new ideas a chance to bubble up along the way and letting the last bits of the jigsaw fit into place as I worked my way through the squares and around all the edges.  Until every last stitch was hooked and every last thread was woven.


I think this is one of those reasonably rare but wonderfully happy occasions when my mind's eye and my real eyes can say they are looking at something fairly similar.

So I'm calling it a success.


The 411...

All the details I thought you might want to know and probably a few more besides.  

Yarn:
13 Square colours:
1.  Stylecraft Special DK - Cloud Blue (1019)
2.  Stylecraft Life DK - Mint (2342)
3.  Stylecraft Special DK - Pale Rose (1080)
4.  Stylecraft Special DK - Soft Peach (1240)
5.  King Cole Pricewise - Pale Blue (19)
6.  Stylecraft Special DK - Apricot (1026)
7.  King Cole Merino Blend - Linden (165)
8.  King Cole Merino Blend - Corn (794)
9.  Stylecraft Special DK - Cream (1005)
10.  King Cole Big Value - Fallow (378)
11.  Stylecraft Special DK - Silver (1203)
12.  Stylcraft Special DK - Sherbert (1034)
13.  King Cole Merino Blend - Caramel (790)
Border:
14.  Stylecraft Special DK - Parchment (1218)

Hook: 4mm
Size: 2.15 x 1.65m (85x65")
Weight: 1666g

Yardage (approx):
80 squares: 3234
Squares and Edging:  966
Border: 966
Total for the blanket: 5166

Patterns:
Squares: A total of 26 different patterns all from Jan Eaton's 200 Crochet Blocks for Blankets
Square Joining:  A combinations of my own pattern (not yet released) and the Join As You Go (JASG) method.
Border:  A combination of my own pattern (not yet released) followed by No 93  from Edie Eckman's Around the Corner, Crochet Borders


S x


My posts, delivered to you...

      RSS        Email      Feedly    Follow on Bloglovin Bloglovin' 

12 A Case for You?

Do you remember these little cuties?  I made one for me and then one for my Sis late last year.  

Well, when I raised the question of which tutorials you'd most like to see on my blog, or Votes for Patterns as I called it, this little Phone Case was pretty high on the list.


I know I haven't mentioned Votes for Patterns for a while now, but I've been working away behind the scenes and have had a little tutorial prepared for these cases for a little while now.

This is only my second sewing tutorial so I hope it's clear enough to follow.  As ever, let me know if you get stuck anywhere on this and I shall try to help if I can.  But be gentle, I'm still learning!


Patchwork Phone Case Tutorial
(This is for an iphone 5, but you could adapt for other sized phones.)

S x


My posts, delivered to you...

      RSS        Email      Feedly    Follow on Bloglovin Bloglovin' 

10 Phone Case Tutorial


Here's my dinky little patchwork case for a mobile phone.   It's a fun little make for yourself and perfect for gifts too.  I hope you enjoy it.

The measurements given below will fit the new iphone 5, as that's what I have, but you could easily adapt this for the iphone 4 or any other mobile for that matter.

Here's what you'll need...

1.  30 squares 1 1/2 x 1 1/2" for the case body (to make a finished size of 6 1/2 x 5 1/2")
2.  1 strip of fabric 1 1/4 x 6 1/2"
3.  2 pieces of fabric 3 1/4 x 2 3/4"
4.  1 piece of lining fabric 6 1/2 x 5 1/2" 
5.  1 piece of wadding roughly 7 1/2 x 6 1/2"
6.  A small piece of Velcro
7.  Ribbon, approximately 4 or 5" long and no more than 3/8" wide.
8.  Embroidery thread (if you want to add some hand quilting touches)

Sew all edges with a 1/4" seam.

Let's get started!


First of all arrange your 30 small 1 1/2" squares (No. 1) into a pleasing arrangement and sew them together, ironing as you go,  to make your patchwork fabric.

Then line up the fabric strip (No. 2), with the top (longest) edge, faces together, and sew along top edge.  (As marked with the black dotted line in the picture.)


Iron this strip open and the outer part of your case is ready.

Take your two smaller pieces of fabric (No. 3), these will become the closing flap for the case, so if you'd like to add some embroidery or appliqué to one of the pieces, now would be the moment.


Place the pieces right side together, and using the base of a cotton reel or something of appropriate size, draw some rounded corners to the top two corners of the fabrics.  (This curved edge with be at the bottom when the flap is closed, so make sure your decorative touches (if you added any) are the right way round.  (See the picture of the finished flap below to see how it should look.)

Cut around these drawn corners to create a nice rounded shape and sew around 3 sides, as show by the dotted line in the picture.


Add a few snips into the seam fabric (taking care not to cut through your stitches of course), then turn right side out.

Iron nice and flat and your flap is ready to go.


Take your piece of ribbon (No. 7), fold it in half and line it up with the centre seam of your patchwork.  Then line your flap up (decorative side down) to the left of the ribbon.  The left hand edge of the flap should be slightly more than  1/4" away from the left edge.  This is very important as we'll need to sew down this edge later and you really don't want to catch the flap in your seam.  Pin ribbon and flap in place.

Take your lining fabric (No. 4) and place this face down over the top and pin in place.  Sew along the top edge as shown by the dotted line in the photo.  This will secure your flap and ribbon in place.

Make sure you press the lining seam towards the thin fabric strip, as shown in the picture.

Take your batting (No. 5) and cut a straight line along one edge.


Line up the straight edge you have just cut with the seam you have just sewn and pin in place.

Make sure the top edge of the wadding covers the seam you've just pressed down.


I like to sew a line just inside this top edge of the wadding, just to hold in securely in place at this stage.  It just makes it all sit nicer when the case is turned the right way round at the end.

If you'd like to add any quilting, you can do that now.  I usually like to hand quilt but you can do it by machine if you prefer.


Once the quilting has been done, cut the excess wadding from around the patchwork.

Take one side of your velcro piece (No. 6) and add that the center of the right hand side of the pouch, just below the fabric strip at the top.  (As shown in the picture)  I line it up with the middle of a square.


Now we need to fold the whole case in half longways, so the right sides of the lining are against each other and the right sides of patchwork are against each other.  We're going to sew around the case, leaving a 2 inch gap along the edge of the lining fabric.  (See black dotted line in the photo)

TIP:  Pin in place, making sure you line up the seams of your patchwork squares for a neat finish at the end.


Once the seam is sewn, cut off the four corners to reduce bulk.

Now it's time to turn the case the right way round.


Sew up the gap in the lining fabric.  I like to hand sew this but you could run your machine along it if you prefer.  Just make sure you keep nice and tight to the edge.

Push the lining fabric down into the pouch.


Almost there now.  The only thing left to do is to take the other side of your velcro piece (No. 6) and folding the flap down, line up the correct position on the flap for the case to close nicely.

Once you have your position right, pin and then sew the velcro piece in place.


That's it, you did it!


I hope you enjoy using this tutorial to make your phone a snazzy and stylish little case.

If you have any problem, just drop me a line.


S x


UPDATE - 8th May 2013: I've now added the size of the fabric you require to make the flap.  A big thank you to Mandy for pointing that out!

LinkWithin

Related Posts Plugin for WordPress, Blogger...